

Implementing OAuth2 Authorization with Keycloak and Gatekeeper
Tue, Feb 18, 2025
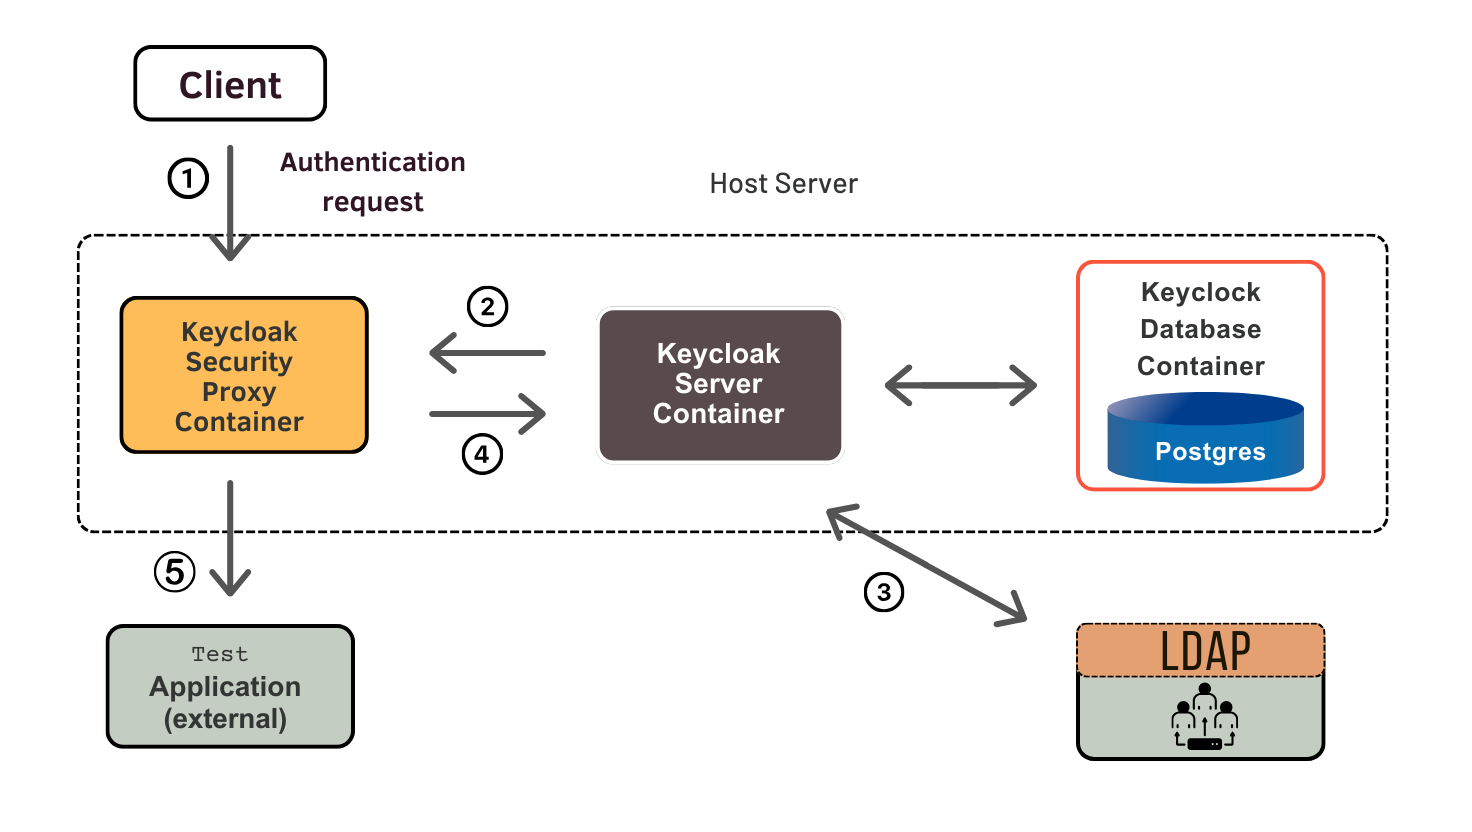
This blog will delve into the technical details of implementing OAuth2 authorization using Keycloak as the identity and access management (IAM) solution, and Keycloak Gatekeeper as the authentication proxy. This setup is particularly useful for securing web applications deployed in a Kubernetes environment.
Keycloak Overview
Keycloak is an open-source IAM platform provided by Red Hat’s JBoss. It supports various authentication and authorization protocols, including OpenID Connect (OIDC) and SAML 2.0. For most use cases, OIDC is recommended due to its modern and efficient implementation compared to SAML.
Setting Up Keycloak
Before integrating Keycloak with Gatekeeper, you need to have a working Keycloak installation. Here are the key steps:
-
Install Keycloak:
Download and install Keycloak from the official Red Hat website or use a Docker image.
Start the Keycloak server and access the administration console.
-
Create a Realm:
In the Keycloak administration console, create a new realm or use an existing one.
Configure the realm settings as necessary.
-
Create a Client:
Within the realm, create a new client application.
Set the Client ID and Access Type to confidential.
Configure the Valid Redirect URLs to match your application's URL.
Note the Client Secret from the "Credentials" tab.
Configuring Keycloak Gatekeeper
Keycloak Gatekeeper is a transparent authentication proxy that integrates with the Keycloak authentication service. Here’s how to set it up:
Authentication Modes
Gatekeeper supports both access tokens in browser cookies and bearer tokens in the Authorization header. This flexibility allows it to handle traditional clients and modern browser-based clients.
Configuration Steps
-
Deploy Gatekeeper:
Gatekeeper can be deployed as a sidecar container within the same Kubernetes pod as your application or as a standalone service.
Ensure the Kubernetes service points to the Gatekeeper rather than the application directly.
-
Configure Gatekeeper Client in Keycloak:
In the Keycloak administration console, create a new client for Gatekeeper.
Ensure the Gatekeeper client is configured with the proper "audience" token mapper. This is crucial as Gatekeeper expects to be listed in the audience claim of ID tokens brought back by Keycloak.
-
Gatekeeper Configuration File:
Create a configuration file for Gatekeeper. Here is an example:
discovery-url: https://your-keycloak-instance.com/auth/realms/your-realm/.well-known/openid-configuration
client-id: gatekeeper-client
client-secret: your-client-secret
encryption-key: your-encryption-key
redirect-url: https://your-application-url.com
resources:
  - uri: /protected-path
    methods:
      - GET
- POST
Run Gatekeeper: Start the Gatekeeper service using the configuration file.
docker run -d --name keycloak-gatekeeper \
  -v /path/to/config.yaml:/config.yaml \
  oneconcern/keycloak-gatekeeper:latest \
--config /config.yaml
Integrating with Kubernetes
To integrate Gatekeeper with your Kubernetes deployment, you can use Kubernetes services and ingress resources.
Using Ingress Annotations
You can protect your web applications using ingress annotations. Here’s an example of how to configure an Nginx ingress to use OAuth2 Proxy (which can be replaced or complemented with Gatekeeper):
Create an Ingress Resource:
Define an ingress resource with annotations that point to the OAuth2 Proxy or Gatekeeper service.
apiVersion: networking.k8s.io/v1
kind: Ingress
metadata:
  name: protected-ingress
  annotations:
    nginx.ingress.kubernetes.io/auth-type: "oauth2"
    nginx.ingress.kubernetes.io/auth-secret: "oauth2-proxy-client-secret"
    nginx.ingress.kubernetes.io/auth-realm: "Protected Area"
spec:
  rules:
  - host: your-application-url.com
    http:
      paths:
      - path: /protected-path
        pathType: Prefix
        backend:
          service:
            name: your-service-name
            Port:
 number: 80
Deploy OAuth2 Proxy or Gatekeeper:
Deploy the OAuth2 Proxy or Gatekeeper service using a Helm chart or a Kubernetes deployment.
helm upgrade --install gatekeeper ./charts/gatekeeper --values gatekeeper/values-gatekeeper.ymlAccessing and Decoding JSON Web Tokens (JWTs)
Once authenticated, the application can access and decode the Keycloak JSON Web Token (JWT) to implement fine-grained authorization.
Passing the Authorization Header:
Configure Gatekeeper or OAuth2 Proxy to pass the authorization header to the application.
|
Decoding the JWT:
In your application, decode the JWT to extract user information and group memberships.
import jwt

def decode_jwt(token):
    try:
        payload = jwt.decode(token, options={"verify_signature": False})
        return payload
    except jwt.ExpiredSignatureError:
        return "Token has expired"
    except jwt.InvalidTokenError:
        return "Invalid token"

# Example usage
token = request.headers.get('Authorization').split(' ')
user_info = decode_jwt(token)
print(user_info)
Conclusion
Implementing OAuth2 authorization with Keycloak and Gatekeeper provides a robust and secure authentication mechanism for web applications. Here are some key consequences and considerations:
Gatekeeper improves application security by centralizing authentication and session verification, eliminating the need for authentication logic within the application code and reducing the risk of vulnerabilities. Its scalability is ideal for Kubernetes deployments, and it supports various authentication methods like cookies and bearer tokens. Centralized management of authentication mechanisms simplifies updates and maintenance. Furthermore, using OIDC and OAuth2 with PKCE ensures adherence to security best practices and protects against common threats, making it a robust and compliant solution.
In summary, integrating Keycloak with Gatekeeper provides a comprehensive and secure solution for authentication and authorization, making it an ideal choice for protecting web applications in a Kubernetes environment.


